Creating a Step
RockTomate has a flexible framework which allows you to create your own Steps and reuse them across different jobs with no hassle.
We’ll be making a step that takes two integers, executes a mathematical operation on them, and returns an outcome.
Creating a Class
First things first, create a C# script inside of an Editor folder, or make sure it’s within an assembly definition which will be compiled only in Editor.
To make things easier to manage, place the script inside of RockTomate/Scripts/Steps/ directory. Let’s name our script MathStep.
A naming convention that RockTomate uses is appending "Step" at the end of every
Stepclass. This makes it easier to identify steps in a project folder.
Add the following namespaces:
using HardCodeLab.RockTomate.Core.Steps;
using HardCodeLab.RockTomate.Core.Attributes;
Have our MathStep class derive from SimpleStep class. Implement a missing method and have it return true for now.
Above our MathStep class declaration, add the following attribute:
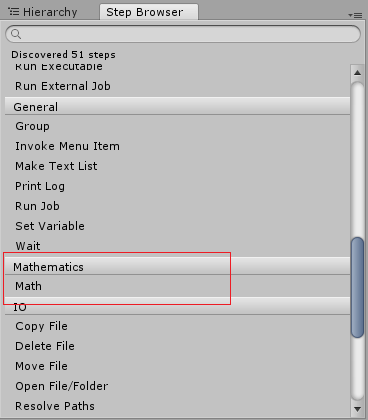
[StepDescription("Math", "Does a math operation", "Mathematics")]
This tells RockTomate surface information about the step. In this case, it tells its name, gives description and associated category. Without this attribute, Step won't show up in the Step Browser window.
This is how MathStep class should look like:
using HardCodeLab.RockTomate.Core.Steps;
using HardCodeLab.RockTomate.Core.Attributes;

[StepDescription("Math", "Does a math operation", "Mathematics")]
public class MathStep : SimpleStep
{
    protected override bool OnStepStart()
    {
        return true;
    }
}
Now, if you go back to Unity and let it compile our changes, we should see new Step in the Step Browser window.
Adding Input Fields
For our math operation, we want to add the following input values:
- First value
- Second value
- Whether we want to add, subtract, multiply or divide both values
Declare variables as follows:
public float ValueA;
public float ValueB;
public MathOperationType OperationType;

public enum MathOperationType
{
  Add,
  Subtract,
  Divide,
  Multiply,
}
To make those variables visible, we would need to add InputField attribute, it lets us specify the display name, tooltip and more for our fields. Note that fields should be public, otherwise they'll be ignored regardless of having an attribute or not.
With fields defined, this is how MathStep class should look like:
using HardCodeLab.RockTomate.Core.Steps;
using HardCodeLab.RockTomate.Core.Attributes;

[StepDescription("Math", "Does a math operation", "Mathematics")]
public class MathStep : SimpleStep
{
    [InputField]
    public float ValueA;

    [InputField]
    public float ValueB;

    [InputField]
    public MathOperationType OperationType;

    public enum MathOperationType
    {
        Add,
        Subtract,
        Divide,
        Multiply,
    }

    protected override bool OnStepStart()
    {
        return true;
    }
}
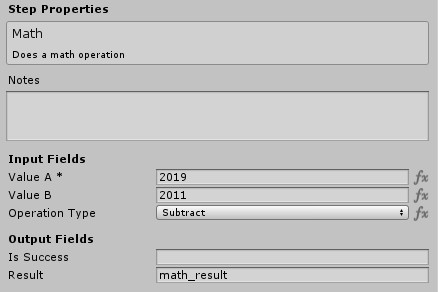
Add our new step into a Job, select it and you should see the following in the Inspector window:

Marking fields as "Required"
Marking fields as "Required" is useful to avoid null reference exception errors and lets user know if the field is necessary for execution (like fields in a survey form). If the field is left empty (unless it's a value type like integer or float), Step will not run.
RockTomate automatically checks if required fields are not null before executing a Step.
To mark a field as required, add required argument to a target InputField attribute:
[InputField(required: true)]
public float ValueA;
Fields marked as "required" will have an asterisk (*) symbol next to it.

Adding Output Fields
After our MathStep step runs a mathematical operation between two values the resultant value needs to be usable by other steps. This can be done by passing them to output fields, which in turn would pass them into a variable specified by us.
By default, all steps have “Is Success” output field: it returns true or false depending on whether step has successfully been executed.
To make our own output field, simply add OutputField attribute on top of a desired field/property:
[OutputField]
public float Result;
Now, if you come back to the editor, you’ll see a new field.

Implementing Logic
Adding logic is straightforward: write step implementation inside of OnStepStart() method. Returned boolean determines whether the Step has executed successfully or not.
protected override bool OnStepStart()
{
   switch (OperationType)
   {
       case MathOperationType.Add:

           Result = ValueA + ValueB;
           break;

       case MathOperationType.Subtract:

           Result = ValueA - ValueB;
           break;

       case MathOperationType.Divide:

           Result = ValueA / ValueB;
           break;

       case MathOperationType.Multiply:

           Result = ValueA * ValueB;
           break;
   }

   return true;
}
Full C# Script for reference:
using HardCodeLab.RockTomate.Core.Steps;
using HardCodeLab.RockTomate.Core.Attributes;

[StepDescription("Math", "Does a math operation", "Mathematics")]
public class MathStep : SimpleStep
{
   [InputField(required: true)]
   public float ValueA;

   [InputField(required: true)]
   public float ValueB;

   [InputField]
   public MathOperationType OperationType;

   [OutputField]
   public float Result;

   public enum MathOperationType
   {
       Add,
       Subtract,
       Divide,
       Multiply,
   }

   protected override bool OnStepStart()
   {
       switch (OperationType)
       {
           case MathOperationType.Add:

               Result = ValueA + ValueB;
               break;

           case MathOperationType.Subtract:

               Result = ValueA - ValueB;
               break;

           case MathOperationType.Divide:

               Result = ValueA / ValueB;
               break;

           case MathOperationType.Multiply:

               Result = ValueA * ValueB;
               break;
       }

       return true;
   }
}
Testing our Step
Now that we’ve finished writing our Step logic, we can finally take it for a spin!
- Drag our step into Job Editor
- Fill out the input fields
- Fill out the output field
- Drag a “Print Log” step, and have it print out
%math_result%variable.
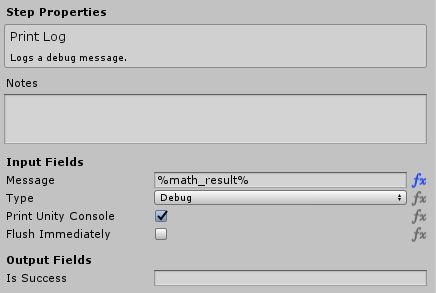
- Run the Job and your Unity console should show your desired number!